Hi! So this is just a lil’ short zine, from one amateur twine-using game maker to another, on how I made a vaguely Myst-esque photos-and-text-exploration twine called Moon Star. For reference, it’s playable at https://communistsister.itch.io/moon-star
I made it using Twine 1.4.2, using the Responsive story format. The machine I use for making games at the moment is a lethargic 9-year-old Macbook, so hopefully most folks will be able to run Twine; however, I’m aware that the formatting is slightly different in other versions, so this may not be applicable outside of 1.4.2.
So, in Moon Star, after the title screen, the first screen you see is this:

And in Twine, it looks like this:
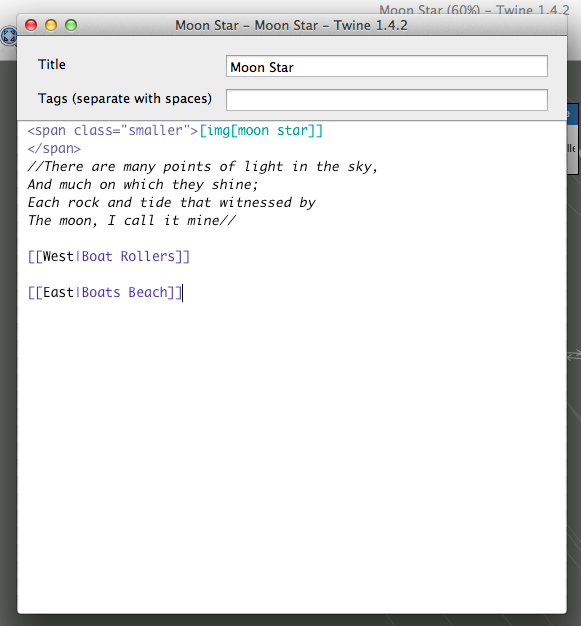
So what’s going on here? Let’s have a look.
- The picture: this is the [img[moon star]] section, contained within a CSS span I’ve named “smaller”. (There’s a hacky reason for that last bit - I’ll explain later.) The format is [img[image passage name]]
- The text - this is typed in between a pair of // marks, which makes it italic. I believe you could use standard html <i> </i> tags instead.
- The navigation section - for each link, we have the text displayed (in black), a | mark, and the name of the passage to go to, in the format [[text displayed|passage name]].
So that’s nice and simple! Each passage is laid out pretty much the same, except the title passage, which is just one link to the passage displayed above.
Let’s look at the story as a whole:

Wowee! So what I did was to first go through my selection of photos and pick out a bunch to use. After this, I drew a map with pen and paper, laying the images out roughly in the order I wanted. When it came to putting them into Twine, I arranged them in the main window as I had on paper - this is what you see on the lower right, with kind of cyan headers.
On the top left, these are the story passages themselves, with blue headers. Again, I laid them out visually in a kind of map. This isn’t strictly necessary, but I’d imagine it would get confusing as heck to design without doing so. This way, I could tell at a glance which compass direction I should use as the text for each link, as well as which passages link to which (shown by the white lines between them).
A closer look at the main passages:

You can see the little arrows between each passage, as well as the names.
A closer look at the image passages:

Here you can see each individual image passage, and my nicknames for each image. Twine also shows you a little version of the picture, which I think is super neat! It made it much easier to plan and arrange things. To get these in a Twine project, you can either use the Story > Import Image > From File… option, or just drag one from your computer straight into Twine!
When opened, the image looks like this:

So there’s nothing really going on here. The Title is what you will use elsewhere in Twine to link to this image. If you refer back to the passage shown before, you’ll see that the code to display this image is [img[moon star]]. Easy as that!
However, one point to mention is that you can’t use the same image name as you can a passage name (I think??). To keep things easy for me to remember, the passage for this is called Moon Star, and the image used is moon star - it’s case sensitive, so this keeps them distinct.
There’s four more passages with different colours that we haven’t touched on. Let’s look at these closer.

StoryAuthor and StoryTitle, in the dark green, are pretty self-explanatory. See the very first image for how these turn out. And the Start passage, in the light green, is a normal passage with the special property that it’s the first passage displayed in your Twine project. Fancy that!!
Now, remember that CSS span? Turns out my camera takes flipping HUGE pictures. I’d already run them through image software (gimp, because I don’t have the money to drop on photoshop) to make them smaller, but after putting the game together they turned out to be too big for most screens still. Normally I’d have playtested this in advance and then done the sensible thing, which would be to go back and shrink each image again. I didn’t do that, because I was making this to a game jam and had hours left at this point! So, I embedded every image in a CSS span instead. So the purple-headed passage - with the unwieldy title of Untitled Stylesheet 1 - has the details for that in it.
Let’s take a closer look at the CSS Stylesheet:

Bleh. It’s simple, but it looks enough like Real Programming Code that I get the shakes. But no worries! The only two I’ve used here are the passage and smaller tags. The passage one is pretty obvious - it makes the text display at font size 16. The smaller one is my own one to reduce the size of the images. It doesn’t actually matter what it was called, but I gave it a descriptive name. The width command shrinks each image to that width, whilst preserving the aspect ratio. Hacky solution to manually resizing images, or genius shortcut? You decide.
So, once all this is in place, it comes to exporting it with the Build command. Now, I made more work for myself here, because I was tired and had come from doing a different project with different requirements; so I’ll tell you what the image below shows, then what you ACTUALLY need to do!

So using the Build > Build Story… menu option, I saved the project as index.html, seen above. In the same directory, I had a media folder, inside which was a folder called images, where all my pictures used for this Twine story were saved. The .html file and folder were then compressed into Moon Star build 1.zip, which is what got uploaded to itch.io. (FYI, the Moon Star.tws file is my twine project file, if you didn’t already know.)
Now, the step with the pictures? THIS WASN’T NECESSARY AT ALL AND I GOT MAD WHEN I REALISED! Images imported into Twine are automatically saved into the story file, so you don’t need to do anything. However, because the last project I made used audio, I was used to making a media folder to contain that, I did it anyway. Silly me. What it DID give me was one convenient folder where I knew all my pictures were for this project, but it didn’t need to be included in the final zip file. All I really needed to do was compress the index.html file on its own. But oh well! It still worked in the end.
So, end of the process, the Moon Star build 1.zip got uploaded to itch.io, where it had the following settings for the game:


And that’s it! Playable online! It takes a while to load because of the pictures - might be quicker if I hadn’t filled the .zip file with tons of unnecessary images…
I found this to be pretty straightforward, once I’d dealt with the faffing around with image sizes & CSS spans to correct it. Now, more challenging was setting up either Autumn Leaves or B.U.R.G, two previous twine projects that used audio. But that’s for next time!
I hope this has been helpful! I’m only a beginner at making games, and I’ve just made a couple of twine projects, but I try to do something different each time to get better. And I like to help people out! Working out showing pictures or audio or whatever - or even how to upload to itch.io - was a little daunting at first, so this little guide will hopefully make it easy. And then YOU can make a picture-based exploration game in Twine! Send me a link if you do ♥
All the best,
Freya C.
@spdrcstl
https://communistsister.itch.io