Creating a Module
There are two ways to begin making a module. The first is to start from scratch (the "New" button), and the other is to load an existing module (the "Load" button) and edit it.
To load an existing module, simply click on the "Load" button on the Create index page. Click on the "Browse" button in the popup and select the .BMM file corresponding to the
module you wish to load. (The .BMM file for installed modules will be located in the "Play/BMM-[MODULE NAME]/" directory.) Now click the "Load" button, and the module editor
will open in a new tab.
The Cache
One module will be saved in the browser's local storage at a time. In theory this will persist if you close your browser, but this can be messed with by updates and browser settings, so it isn't necessarily safe to rely on the storage alone. Creating a new module or loading one from a file WILL overwrite this module, and there is no guaranteed way to recover it if it has not been exported. This will also be deleted by default if you clear your browser's history/cookies/etc. Therefore it is recommended that you export modules occasionally to make sure that data is not lost. These modules can be re-loaded from the .BMM file in the exported .zip folder.
New Module
At the top of the module edit page is a text field for the name and the content description. The content description will be shown on the module selection page. There is no set
rule for what needs to be included in the content description, but the intention is that it will consist of a short teaser for the module as well as content warnings, such as "Tickling",
"Guy In Distress", and whatever the author may feel some people may be uncomfortable with.
These will be populated automatically when a module is loaded from a file.
The module name will be used in the name of a directory, so some special characters may cause issues. Currently spaces are safe, but no other non-alphanumeric characters have been tested.
Characters and Classes
Modules have two ways to handle player characters: Characters and Classes. Classes will allow players to customize their avatar before playing, while Characters are predefined.
Currently the difference is that Characters have names and Classes allow the player to specify a name at the time of creation, but in the future this will affect player skills,
abilities, and more.
Each module can only use either Characters or Classes at one time. To switch between them, change the radio button marked "Character Type." The "Edit" button will take you to the
page corresponding to the selected character type. Selecting "Custom" will set the module to use Classes, and selecting "Created" will set the module to use Characters. Both
Characters and Classes will be tracked and saved by the module editor, so nothing will be lost if the module is switched to the other character type. Changing it back will restore
all previously created entities.
Switching Character Types
Switching the module's character type late in development may have unintended consequences for data stored elsewhere, like the scenarios/nodes. It is recommended to decide on a character type early and stick to it to avoid issues.
Read More:
Characters and ClassesText Replacers
Text replacers are used in module scenarios to add variety that respects the player's character. Characters have their values defined by the creator, while Classes allow the
player to choose the values. The "Name" of the replacer is the value that the player will see at the creation screen and should describe what the replacer will be used for.
The "Key" is the text that you will use to reference the replacer during the body of action nodes. For example, prebuilt examples include the pronoun replacers, where the
Subjective Pronoun has Key [S_pronoun].
Creator-defined replacers are case sensitive: Typing them in all caps will make the replacement capitalize the first letter of the value, and typing them in all lower case
will make the value all lower case. Anything in between will not be repalced. (Example: [HAIR_COLOR] = Black, [hair_color] = black, [Hair_color] is invalid.)
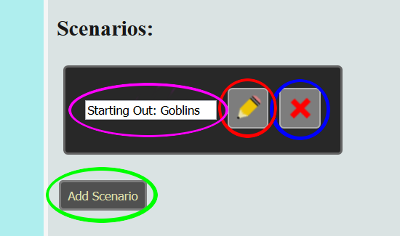
Scenarios
If a Module is the "game," then its Scenarios are the "levels." Each scenario will consist of various decisions and combat encounters for the player to work through. Scenarios can rely on the completion of other scenarios before the player is allowed to attempt them. Each Scenario can be replayed as many times as desired to grind items and experience. In the future each Scenario will support multiple endings and Scenarios will be able to be locked behind specific endings. Below is a diagram of the Scenario manager.
|
|
Read More:
ScenariosItems
All consumable items fall under this category. Currently items can be used to replenish HP and SP, Buff-Debuff allies and enemies, escape from bindings, and inflict status effects. (Ignoring the fact that statuses haven't been implemented yet.) Items can also be used to unlock options during Scenarios.
Read More:
ItemsEquipment
Equipment consists of all wearable items. Restraints are classified as equipment, and can be equipped on friends or foes like regular equipment. Unlike regular equipment, restraints must be struggled against rather than simply unequipped. Currently the player can only change equipment during battle.
Read More:
EquipmentEnemies
Edit the opponents that the player will meet in combat encounters. In the future it will be possible to "target" an enemy to a specific Class/Character and level to more accurately prototype modules.
Read More:
EnemiesCombat Constants
You can edit some of the numbers used in combat for a more fine-tuned experience. Default values are provided, although changes can be made to influence the combat experience. Changing the constants is not necessary for module creation, but it is available for creators that want to fine tune their module.
Read More:
Combat ConstantsVersion Control
The "Version Control" button will parse through the module and add any missing attributes in code. The most common use for this is if you load an older module into a newer version of Bondage Modules. New features may have been added that the code expects the module to have data about. If it cannot find the data it will most likely cause errors. To fix this, click this button to have the missing features added on and initialized with empty/default values.
Read More:
Version ControlExporting
Once the module is complete, it needs to be exported before it can be played. Exporting is also used as a more safe and reliable way to save modules that are still in the creation stage. Simply clicking the "Export" button will generate a zip file from which the module can be installed or reloaded later.
Read More:
Export ModuleModule Installation